CREDIT CARD & COIN TIMERS
  • Washer
    • Electric Dryer
    • TWO Timer Washer Dryer Combination
    • Shower
    • worldwide
    • EV Charger Level 2
    • Crypto and Credit Card
    • Door Lock
    • Thermostat
    • Garage Door Opener
    • Stack-able Washer & Dryer
    • Gas Dryer
    • Electric eBike Charger
    • Car Wash and Soap
    • USA Store
    • Photo Gallery
  • PayBox Login
  • How To
    • Video Library
    • Price >
      • Set Price
      • Set Price Washer
      • Set Price Dryer
      • Set Price Car Charger
      • Set Price Shower
      • How to Use Coin Box
    • Timer >
      • Timer Quick Start
      • Timer Delay Start
      • Timer Minute Hour Format
      • Timer Factory Defaults
      • Control Time of Use
      • Replace Timer Board
      • Heat Sink
      • Two Water Valves
    • Coin >
      • Coin Setup
      • Set Dip Switches
      • 3 Coin Setup
      • How to Fix a Coin Jam or Coin Rejection ​Problem
      • Replace Coin Acceptor
      • Replace Coin Acceptor LED Sensor
      • Tenant or Landlord Coin Acceptor Mode
      • Coin Collection Empty
    • Installation
    • Plug >
      • Incorrect L Shape Dryer Plug Prong Problem
      • Large Electric Dryer Plug
      • Replace 3 to 4 Prong Dryer Plug
    • Facebook Group
    • Button >
      • Push Button Upgrade
      • Test Button with Jumper Wire
      • Replace Button Capacitor
    • Display Windows >
      • Top Window Camera
      • Bottom Window Price
      • Back Panel Knock Out
    • Locks >
      • Replace Key Lock
      • Set Combination Pad Lock
      • How to Prevent Coin Box Theft
    • Signs >
      • Print Washer Sign
      • Print Dryer Sign
      • Print Shower Sign
      • Print Car Charger Sign
    • Choose >
      • Which Unit to Buy
      • Best Washer & Dryer
      • Side by Side or Stack
    • More >
      • Fuse Block vs Circuit Breaker
      • High Quality Coin Acceptor Codes
      • Warranty
      • Frequently Asked Questions
      • Cost Benefit Analysts of Coin Laundry
  • Contact
    • Technical Support
    • Warranty Claim
    • Consulting Services
    • Privacy Policy
    • Our Team
    • How it's made
    • Jobs >
      • Submit Resume
      • Video Production
      • Administrative Assistant

3 Prong to 4 Prong Dryer Cord Change

Picture
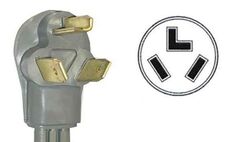
Older homes typically have 3 prong outlets, but the National Electrical Code requires homes built after the year 2000 to have 4 prong outlets.  While these same codes prohibit changing a 4 prong to a 3 prong.  The Electrical safety codes allows changing the dryer's cord to match the existing outlet.  Almost all manufacturers sell dryers without a cord attached, preferring to let customers choose.


Picture

3 Prong to 4 Prong Dryer Cord Conversion Kit 240 volts

$50.00
Add to Cart

Replace 3 prong with
​
​4 prong dryer plug

3 Prong dryer plug

Picture

4 Prong dryer plug

4 wire outlet

Picture
Picture

How to Change a Dryer Cord

OPEN THE ACCESS PANEL

Picture
• Unplug the dryer. 
• Open the access panel where the cord enters the back of the dryer. 
• Use pieces of masking tape to label which colored wire attaches to each terminal. The wires are typically color-coded, with a black wire on one end, a white wire in the middle, and a red wire on the other end.

REMOVE THE OLD CORD

Picture
• Loosen the connection screws holding the wires in place. 
• Disconnect the ground wire or strap that connects the center terminal to the case. 
• Use pliers to hold the strain relief bracket in place while loosening the bracket's screws. 
• Remove the old cord.

ATTACH THE NEW CORD

Picture
Tip: When replacement cord wires are color-coded, simply match the colors of the new cord’s wires to those on the terminal block. 

3-prong cord 

• Attach the middle or groundwire to the center terminal, one of the outer wires to the right terminal, and the other outer wire to the left terminal. 
• Attach the ground strap or wire that runs from the center terminal to the dryer case. 

4-prong cord 

• Attach the white wire to the center terminal, the red wire to the right terminal with the red wire installed, and the black wire to the left terminal with the black wire installed. 
• Attach the green wire to the green grounding screw or dryer case. 
• Remove the masking tape labels.

REPLACE THE ACCESS PANEL

Picture
• Fit the strain relief bracket into the cord access hole and evenly tighten both bracket screws firmly onto the cord. This is important as the bracket protects the connections and helps avoid a possible short if the cord is yanked. 
• Replace the access panel on the back of the dryer.

TEST THE DRYER

Picture
• Double check that the power to the dryer outlet is turned off. 
• Plug the dryer into the outlet. 
• Turn on the power to the outlet and test your dryer.

Office Address

What Our Clients Are Saying

"GREAT INVESTMENT - We rent out my basement to students and the coin laundry conversion box worked like a charm.  The students don't abuse there laundry privileges any more and we made all my money back in the first year."

Facebook